

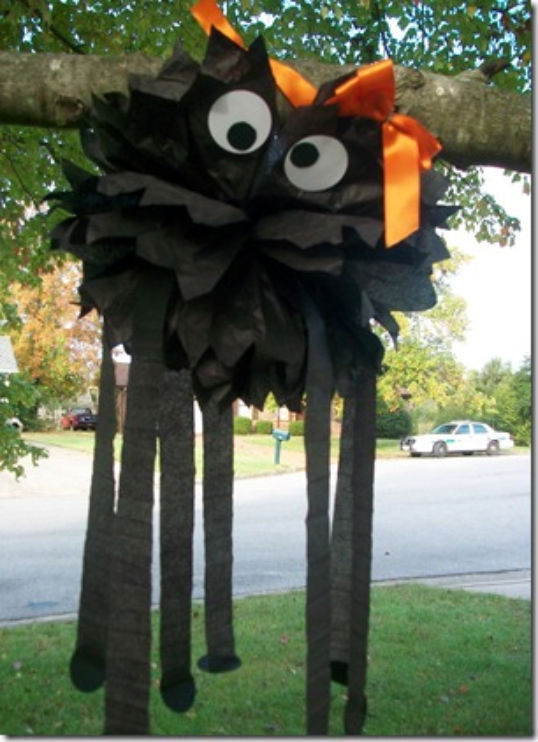
How cute, fun, and EASY! I love these adorable spider poms from Candy at The Party Bakery! Candy shares step-by-step how to make these spiderific decorations to add to your Halloween fun!

In Candy’s words…
“Spiderella” is a breeze to make.
Materials you will need
1 pack of black tissue paper (I used 8 to 10 sheets depending on the size you would like)
1 sheet of Black Cardstock
1 sheet of White Cardstock
1 Pipe cleaner or Floral Wire
Some orange ribbon for a hair bow if your making a girl spider
Fishing line or Ribbon to hang your spider from
Your going to start by making a basic tissue pom. I stack 8-10 sheet of tissue paper and then start making 1 inch to 1.5 inch accordion folds back and forth until you have reached the end of your stack.


Next I like to trim off one of the ends to get my desired length for my tissue pom. The piece you trim off will also be used for making spider legs.
I like mine to be about 17 inches long for a large spider. After you trim off the excess place it to the side to be used later.

Then using your pipe cleaner or floral wire secure it around the middle of your stack . At this point I like to attach my fishing line or ribbon for hanging. You can attach it under the pipe cleaner or wire or simply make a loop when your twisting your pipe cleaner or floral wire to feed it through.


The next step is to cut your edges into either a point or a rounded edge. I prefer a point for a spider.

Now your ready to fluff! Flip your tissue stack onto its side and fan it out a bit. Hold it in the middle with one hand and gently begin to pull apart each layer. I like to pull half of the sheets from the top and then switch and pull the other half towards the bottom. If it rips a little don’t panic! You can usually trim it off or just hide that piece when you fluff it.


After all of your layers are separated fluff it a bit to give it a nice even full shape.
So now you have your spider body it’s time to bring it to life..
Using the excess tissue paper that you set aside earlier determine how thick you would like your legs. I did about 1 inch. Trim that stack to your desired width. You will already have it folded into an accordion fold because you trimmed it off of your tissue stack after it was folded. I like a smaller fold on the legs so I unfold the stack and lay it out on the table and repeat the steps to making an accordion fold but this time I do it at about 1/2 inch. This is totally up to your taste so play around a bit and make it how you think you would like it the best. After you fold it again you now have 8 layers of tissue that will become your 8 spider legs.
Using a circle cutter and your black cardstock punch out 8 circle feet. If you don’t have a circle cutter trace something circular and using scissors cut out your circles or try a different shape…again it’s totally up to your creativity! While you have your circle cutter out go ahead and cut 2 circles out of your white card stock for the eyes and then 2 smaller black circles for the pupils of the eyes.


Separate each tissue layer and using a glue stick attach your circle feet to the bottom of one of your legs. Also glue your pupils onto your white eye’s. Have fun with the placement of your pupils…moving the pupils around will really change the personality of your spider!


Once all of your legs are ready begin gluing them onto your tissue pom. I like to attach them around the middle of the tissue layers. I did an 8 layer spider so I placed my legs in the middle with 4 tissue layers above the legs and 4 below the legs.
Now using your glue stick again attach your eyes. I attach mine on the second layer of tissue so that she looks a little furry around the top of her eyes.
")
Now if your making a Spiderella (girl) add a cute little orange bow to her hair.
")
Ta-da!!! You did it!! Easy cheap and soooo cute! These look adorable hanging outside because the wind will blow it gently and their little legs dance around…lol. Really cute!
I had some bright green tissue paper lying there also and thought how cute would little monsters be to go along with the spiders so I created this guy the same way!

Add a bunch together and hang from your trees for your Halloween party or trick-or-treat night! These would also be great for a monster party!

Happy Haunting!
Find more party fun at The Party Bakery! Thanks, Candy!
Related Articles

The Best Nantucket Travel Guide
I had never fallen in love with a place before until I met Nantucket 28 years ago- and, let me tell you, I fell hard.…
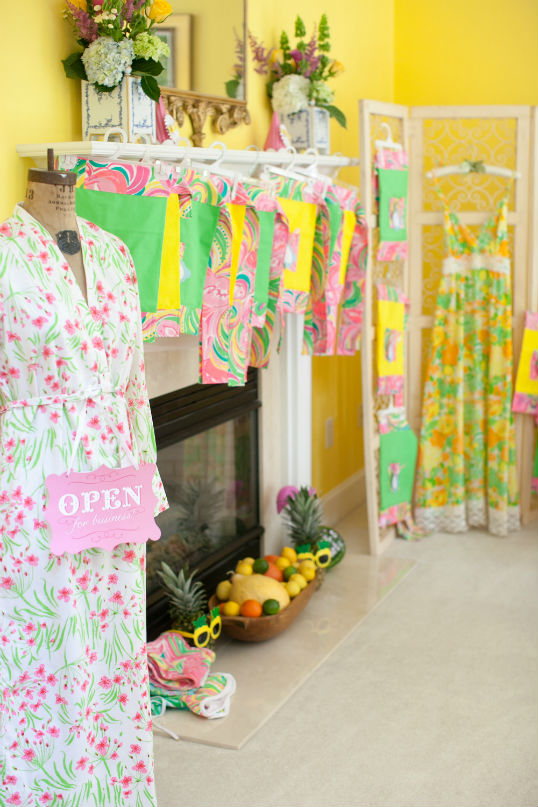
LILLY PULITZER CAKE DECORATING FLAMINGO BIRTHDAY PARTY IDEAS
There is nothing like the bright colors and happy prints of Lilly Pulitzer to make every day feel like a party! For my daughter’s 12th birthday party, she wanted to decorate cakes~ Lilly-style! So, in order to decide how to mesh the two, I kept thinking “if Lilly had a cake shop instead of a juice stand”… I have to admit, this was one fun party to plan! It is a blast to see where ideas go in the hands of a TWEEN! Enjoy and remember, “…being happy never goes out of style!”.

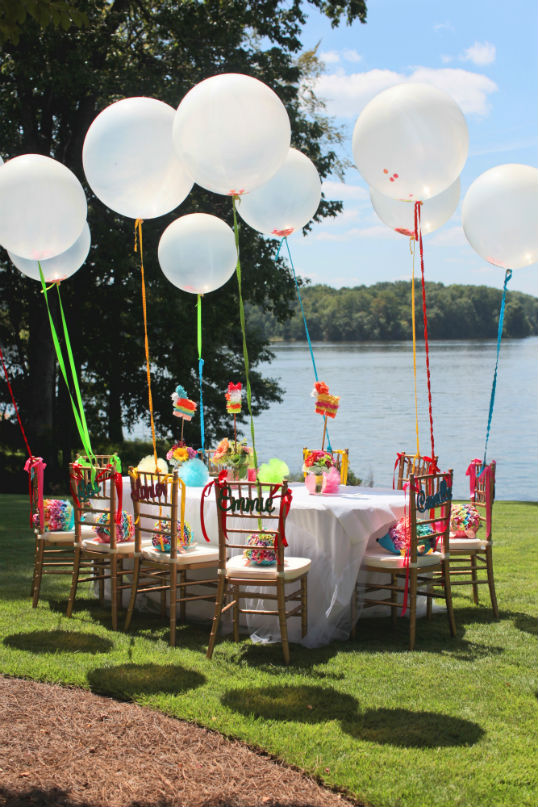
CAMILLE’S FIESTA ~ MEXICAN THEME BIRTHDAY PARTY IDEAS
Celebrating your birthday with a Mexican Fiesta is a sure way to have a great time! My daughter and several of her friends had a ball with all of the bright colors and (hopefully) vivid memories of a beautiful party day full of fun! Planning all of the party ideas and details was loads of fun- although we don’t claim to have everything authentically perfect- this is our take on a party that combines Mexican birthday party ideas with a young girl’s likes and wishes! For instance, we know hedgehogs don’t hail from Mexico- but when she fell in love with a festive-looking hedgehog at a local shop, we decided the hedgehog would make a perfectly fun party favor! So read on and enjoy- and hopefully you will find an idea or two that you can use for a Mexican-themed party or even a Cinco de Mayo celebration, too- and inspiration to incorporate ideas that make your party perfectly-suited for the birthday child!

The Supper Club Soiree in Birmingham
The very first Supper Club Soiree was held in Mountain Brook, Al. Mountain Brook is a beautiful village in Birmingham with a quaint feel within…
LITTLE HOUSE ON THE PRAIRIE PARTY
What began as a simple gesture to introduce my daughter to a wonderful book series has become a special evening ritual for us- reading Laura Ingalls Wilder’s Little House books! I must admit, I didn’t realize quite how interesting these books would be to her, but she cannot wait to read all nine in the series. It was only fitting that her birthday party focus around Little House on the Prairie! Together, we had a ball planning all of the details of her party that related to the books in some way. At Camille’s request, we focused on some of her favorite parts of the stories… prairie flowers, covered wagons, tee pees, the colors in the drawings of the books, and “pretty”…because “Ma” liked things to be pretty!


Responses